06. Deployment to Kubernetes using CodePipeline and CodeBuild
Deployment to Kubernetes using CodePipeline and CodeBuild
You should now be ready to deploy your application using CodePipeline and CodeBuild. Follow the steps below to complete your project.
Create the Pipeline
You will now create a pipeline which watches your Github. When changes are checked in, it will build a new image and deploy it to your cluster.
-
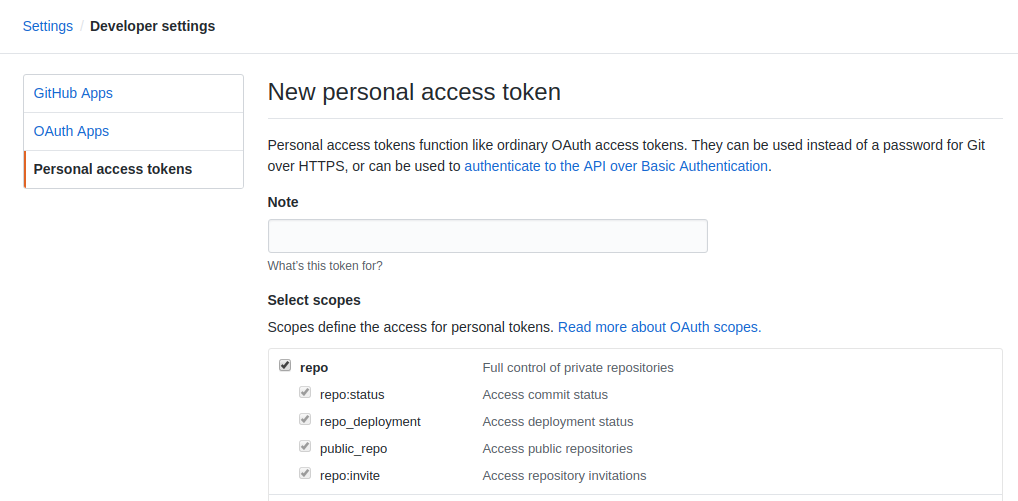
Generate a GitHub access token.
A Github acces token will allow CodePipeline to monitor when a repo is changed. A token can be generated here . You should generate the token with full control of private repositories, as shown in the image below. Be sure to save the token somewhere that is secure.

- The file buildspec.yml instructs CodeBuild. We need a way to pass your jwt secret to the app in kubernetes securly. You will be using AWS Parameter Store to do this. First add the following to your buildspec.yml file:
   env:
     parameter-store:
       JWT_SECRET: JWT_SECRET
This lets CodeBuild know to set an evironment variable based on a value in the parameter-store.- Put secret into AWS Parameter Store
aws ssm put-parameter --name JWT_SECRET --value "YourJWTSecret" --type SecureString-
Modify CloudFormation template.
There is file named ci-cd-codepipeline.cfn.yml , this the the template file you will use to create your CodePipeline pipeline. Open this file and go to the 'Parameters' section. These are parameters that will accept values when you create a stack. Fill in the 'Default' value for the following:
- EksClusterName : use the name of the EKS cluster you created above
- GitSourceRepo : use the name of your project's github repo.
- GitHubUser : use your github user name
- KubectlRoleName : use the name of the role you created for kubectl above
Save this file.
-
Create a stack for CodePipeline
- Go the the CloudFormation service in the aws console.
- Press the 'Create Stack' button.
- Choose the 'Upload template to S3' option and upload the template file 'ci-cd-codepipeline.cfn.yml'
- Press 'Next'. Give the stack a name, fill in your GitHub login and the Github access token generated in step 1.
- Confirm the cluster name matches your cluster, the 'kubectl IAM role' matches the role you created above, and the repository matches the name of your forked repo.
- Create the stack.
You can check it's status in the CloudFormation console .
-
Check the pipeline works. Once the stack is successfully created, commit a change to the master branch of your github repo. Then, in the aws console go to the CodePipeline UI . You should see that the build is running.
-
To test your api endpoints, get the external ip for your service:
kubectl get services simple-jwt-api -o wideNow use the external ip url to test the app:
   export TOKEN=`curl -d '{"email":"<EMAIL>","password":"<PASSWORD>"}' -H "Content-Type: application/json" -X POST <EXTERNAL-IP URL>/auth  | jq -r '.token'`
curl --request GET '<EXTERNAL-IP URL>/contents' -H "Authorization: Bearer ${TOKEN}" | jq - Save the external IP from above to provide to the reviewer when you submit your project.
Concept Checklist
Task Feedback:
Fantastic work! You just need to add tests to your build, and you will have completed your project!